There is nothing quite like the aroma of fresh Homemade Naan Bread wafting through your kitchen, especially when it is topped with a glistening sheen of melted butter and minced fresh garlic. If you have been searching for that perfect, restaurant-quality side dish that features large, characteristic charred dark brown air bubbles and a soft, airy interior, you have found the ultimate guide. This recipe delivers a soft, elastic, and airy dough that rivals any traditional tandoor-baked bread.
Imagine pulling apart a warm piece of bread that has been perfectly blistered on a hot skillet, its surface adorned with vibrant garnish of freshly chopped green cilantro flakes. This Homemade Naan Bread is designed to be the perfect vessel for scooping up sauces or enjoying on its own as a pillowy, buttery snack. Whether you are a beginner baker or a seasoned pro, the visual appeal of these golden-brown blisters will make this your new go-to recipe.

Why This Is The Best Homemade Naan Bread You Will Ever Make
- The Perfect Texture: A combination of yeast and Greek yogurt ensures a dough that is incredibly soft, elastic, and airy.
- Authentic Char: You don’t need a tandoor oven to get those iconic charred dark brown air bubbles; a simple cast-iron skillet does the trick.
- Flavor Infusion: We use a generous amount of melted salted butter and minced fresh garlic to create a savory crust that pops.
- Visual Masterpiece: With golden-brown blisters and a vibrant garnish of freshly chopped green cilantro flakes, this bread looks as good as it tastes.
Essential Ingredients for Fluffy, Blistered Naan
To achieve that signature Homemade Naan Bread look and feel, each ingredient plays a specific role in the culinary science of leavened dough.
- All-Purpose Flour: 3 cups (375g). This provides the structural foundation for the soft, elastic crumb.
- Active Dry Yeast: 2 teaspoons (7g). The engine that creates those large, characteristic charred dark brown air bubbles.
- Warm Water: 3/4 cup (180ml). Must be between 105°F-115°F to activate the yeast without killing it.
- Greek Yogurt: 1/4 cup (60g). The acidity in the yogurt tenderizes the gluten, ensuring the dough remains soft and airy.
- Honey or Sugar: 1 tablespoon (15ml). Feeds the yeast and aids in the development of golden-brown blisters through caramelization.
- Salt: 1 teaspoon (6g). Enhances the natural flavors of the fermented dough.
- Melted Salted Butter: 4 tablespoons (56g). Provides the glistening sheen and rich mouthfeel.
- Fresh Garlic: 3 cloves, minced. Infuses the melted salted butter with a pungent, savory aroma.
- Fresh Cilantro: 2 tablespoons, chopped. Adds a vibrant garnish of freshly chopped green cilantro flakes for a professional finish.

How to Master the Charred Leavened Dough
Step 1: Activating the Yeast for Maximum Lift
In a small bowl, combine your warm water (180ml) and honey. Sprinkle the active dry yeast over the top and let it sit for about 5-10 minutes. You are looking for a foamy, frothy head to develop; this is the sign that your yeast is alive and ready to create those airy bubbles.
If you enjoy making your own breads from scratch, you might also love our recipe for homemade ciabatta bread (coming soon) which uses a similar hydration technique for a chewy crust.
Step 2: Mixing the Soft and Elastic Dough
In a large mixing bowl, whisk together the flour and salt. Create a well in the center and pour in the yeast mixture and the Greek yogurt. Stir until a shaggy dough forms.
Turn the dough onto a lightly floured surface. Knead for 5-7 minutes until the dough becomes soft, elastic, and smooth. If the dough is too sticky, add flour one tablespoon at a time. The texture should feel like a soft earlobe when pressed.
Step 3: The First Rise
Place the dough in a lightly oiled bowl and cover with a damp cloth. Let it rise in a warm, draft-free spot for 1 hour, or until it has doubled in size. This fermentation period is crucial for developing the gases that will later expand into charred dark brown air bubbles.
Step 4: Dividing and Shaping
Punch the dough down to release excess air. Divide into 8 equal portions and roll them into smooth balls. Let the balls rest for 10 minutes; this relaxes the gluten, making it much easier to roll the dough out thin without it snapping back.
Step 5: Rolling for the Perfect Blister
Using a rolling pin, roll each ball into an oval or circle about 1/4 inch (6mm) thick. Don’t worry about perfect symmetry; the rustic look is part of the charm of Homemade Naan Bread.
Step 6: The High-Heat Sear
Heat a cast-iron skillet over medium-high heat. Do not oil the pan; the dry heat is what creates the best charred leavened dough. Place one piece of dough in the hot skillet.
Visual Cue: Within 30-60 seconds, you should see large bubbles puffing up on the surface. Once the bottom has golden-brown blisters, flip the naan. Press down slightly with a spatula to ensure the bubbles make contact with the pan, creating those characteristic charred dark brown spots.
Step 7: The Butter and Garlic Finish
While the naan is still hot, brush it generously with the melted salted butter mixed with minced fresh garlic. Sprinkle with the vibrant garnish of freshly chopped green cilantro flakes. The heat of the bread will slightly “cook” the garlic, removing its raw bite while keeping the flavor intense.
Serve these warm alongside a bowl of creamy coconut garlic shrimp for a truly decadent meal.
Expert Tips for Success
- Skillet Temperature is Key: If your pan isn’t hot enough, the naan will become dry and tough before it chars. Wait for the skillet to slightly smoke before adding the dough.
- Don’t Over-Flour: Use just enough flour to prevent sticking. Too much flour will burn in the pan and create a bitter taste.
- Keep it Covered: As you cook the naan, stack the finished pieces on a plate and cover them with a clean kitchen towel. This traps the steam, keeping the bread soft and elastic.
- The Yogurt Secret: Always use full-fat Greek yogurt. The fat content contributes to the oily reflection and tender crumb seen in professional photos.
Storage, Reheating & Freezing
Storage: Keep leftover Homemade Naan Bread in an airtight bag at room temperature for up to 2 days.
Reheating: To restore that soft, airy texture, wrap the naan in a damp paper towel and microwave for 15-20 seconds. Alternatively, reheat in a hot skillet for 30 seconds per side.
Freezing: These freeze beautifully! Place parchment paper between each piece of naan and store in a freezer-safe bag for up to 3 months. Thaw at room temperature before reheating.
What to Serve With This
This versatile bread is the perfect companion for a variety of dishes. Try it with:
- Classic Indian curries like Butter Chicken or Tikka Masala.
- As a wrap for Greek chicken gyros.
- Dipped into a fresh Mexican street corn salad for a fusion twist.
Frequently Asked Questions
Yes, you can substitute yogurt with whole milk or a vegan buttermilk (plant milk + lemon juice), though the texture may be slightly less elastic and tender.
Yes, bread flour will result in a chewier, more elastic naan due to the higher protein content, while all-purpose flour keeps it slightly softer.
No! A cast-iron skillet is the best household substitute. It retains high heat perfectly to create those characteristic charred dark brown air bubbles.
Immediately stack the cooked naan on a plate and cover it with a clean kitchen towel. The steam will keep the bread soft, elastic, and airy instead of becoming crisp.
This usually happens if your skillet isn’t hot enough or your yeast wasn’t properly activated. Ensure the pan is preheated until very hot and the yeast is foamy before mixing.
The Ultimate Homemade Naan Bread Recipe Card
Ready to create your own charred leavened dough? Follow the exact measurements below for guaranteed success. This recipe makes 8 medium-sized naan breads that feature a glistening sheen of melted butter and minced fresh garlic.
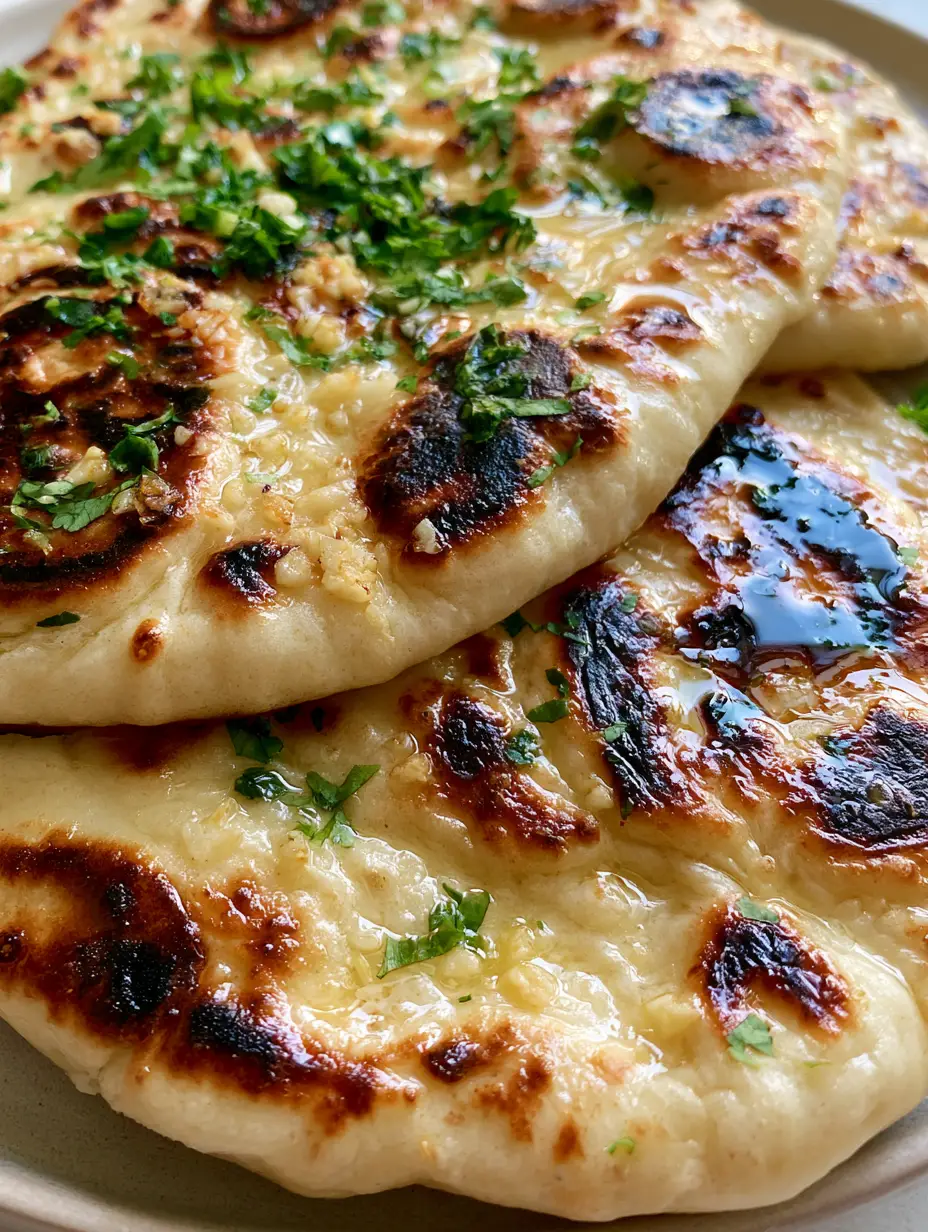
Homemade Naan Bread with Garlic and Melted Salted Butter
Ingredients
Equipment
Method
- Combine warm water, honey, and yeast. Let sit for 5-10 minutes until foamy.
- Mix flour, salt, yeast mixture, and yogurt. Knead for 5-7 minutes until soft and elastic.
- Place in an oiled bowl, cover, and let rise for 1 hour until doubled in size.
- Divide dough into 8 balls. Roll each into a 1/4 inch thick oval.
- Heat a cast iron skillet over medium-high heat. Cook naan for 1 minute until large bubbles form and bottom is charred. Flip and cook for 30-60 seconds.
- Brush with garlic butter and sprinkle with cilantro while hot.
Notes
Keep finished naan under a towel to stay soft.
Save This Recipe to Pinterest!
If you loved this Homemade Naan Bread, make sure to save it to your favorite Pinterest board so you can find it later! We love seeing your kitchen creations—share a photo of your charred bubbles in the comments below and don’t forget to give this recipe a 5-star rating if it’s the best naan you’ve ever had. Follow savorycrafted for more daily recipe inspiration!