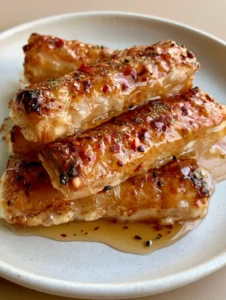
There is something undeniably primal and satisfying about a Grilled Kielbasa Sandwich held in your hand on a warm afternoon. Imagine a soft, toasted hoagie bun cradling a thick, juicy beef kielbasa that has been split down the middle to reveal deep, mahogany grill marks. This isn’t just a quick lunch; it is a masterclass in texture, combining the snap of the sausage casing with the silky sweetness of golden-brown onions and the smoky char of blistered bell peppers. Each bite offers a glistening, savory experience highlighted by a sharp, jagged drizzle of classic yellow mustard that cuts through the rich fats perfectly.
When you prepare this Grilled Kielbasa Sandwich, you are leaning into a tradition of outdoor cooking that values high-quality smoked meats and fresh produce. The visual appeal is just as important as the flavor—those blackened edges on the pepper strips and the translucent glow of the onions tell a story of heat and transformation. Whether you are standing over a backyard grill or using a cast-iron griddle indoors, the goal is to achieve that authentic, unedited mobile photography look where the juices slightly soak into the bread, promising a sandwich that is as messy as it is delicious.
This recipe is designed for the enthusiastic home cook who appreciates the nuances of the Maillard reaction. We are going to treat every component with respect, from the way we slice the aromatics to the specific internal temperature of the beef. By the time you finish this guide, you will have mastered the art of the stadium-style handheld, creating a meal that looks like it was captured in the soft, natural light of a perfect summer day.
Why This Seared Sausage Handheld Works Every Single Time
- The Maillard Masterpiece: By splitting the beef kielbasa lengthwise, we double the surface area exposed to the heat, creating those essential charred grill marks and a glistening, juicy interior.
- Triple-Texture Veggies: We combine long-simmered, translucent caramelized onions with high-heat blistered red and green bell pepper strips for a complex mouthfeel.
- The Structural Foundation: A toasted white hoagie bun provides a sturdy yet soft vessel that absorbs the flavorful drippings without falling apart.
- Balanced Acidity: The bright yellow mustard drizzle isn’t just for color; its vinegar base provides the necessary contrast to the rich, smoky beef and sweet onions.
- Speed and Simplicity: Despite the gourmet appearance, this entire meal comes together in under 40 minutes, making it a high-reward dinner for any day of the week.

The Essential Elements of a Perfect Griddle-Seared Sandwich
To achieve the visual and culinary results seen in our professional blueprint, you must start with the right building blocks. While the kielbasa is the star, the supporting cast of ingredients ensures the “handheld” experience is structurally sound and flavor-dense.
1 lb (450g) Smoked Beef Kielbasa: Seek out a high-quality beef variety for the richest flavor profile. The smoked nature of the meat means we are primarily focused on reheating and achieving that specific charred exterior rather than “cooking” from raw.
2 large (400g) Yellow Onions: We use yellow onions for their high sugar content, which allows them to transform into the golden-brown, translucent ribbons required for the topping. If you enjoy a bit more sweetness, you can substitute with Walla Walla or Vidalia onions.
1 Red and 1 Green Bell Pepper (150g each): These provide the vibrant color contrast seen in the visual prompt. Their skins will be intentionally blackened in spots to provide a rustic, smoky depth to the Grilled Kielbasa Sandwich.
4 Soft White Hoagie Buns: A “long roll” style is best here. It needs to be soft enough to bite through easily but dense enough to hold the weight of the split sausage and heavy toppings.
2 tbsp (30g) Unsalted Butter: This is an “invisible” foundational ingredient used for both the slow-cooking of the onions and the internal toasting of the buns. Butter provides a better crust and flavor than oil for the bread component.
1 tbsp (15ml) Neutral Oil (Grapeseed or Vegetable): Used for the peppers, a high-smoke point oil allows us to blister the skins at high heat without the fats burning or becoming bitter.
Yellow Mustard: The final “jagged drizzle.” It should be standard yellow mustard for that nostalgic, bright aesthetic and sharp flavor profile.
Fine Sea Salt and Cracked Black Pepper: Essential for seasoning the vegetables as they cook to draw out moisture and enhance the natural sweetness of the peppers.
Tools for Achieving the Ultimate Char
You don’t need a professional kitchen, but a few specific tools will help you replicate the “blistered” and “charred” textures described in our visual guide. A heavy-duty cast iron skillet or an outdoor gas grill is ideal for maintaining the high, consistent heat required for the peppers and sausage.
A sharp chef’s knife is required for the “thin strips” of peppers and the translucent onion slices. To achieve the perfectly split kielbasa, a steady hand and a flat cutting surface are key. You will also want a sturdy pair of metal tongs to flip the sausages and a wide spatula for tossing the peppers and onions to ensure even caramelization without mushiness.

Mastering the Flame: How to Assemble the Ultimate Grilled Kielbasa Sandwich
Phase 1: The Art of the Translucent Onion
Begin by peeling your yellow onions and slicing them into thin, even half-moons. In a large skillet over medium-low heat, melt 1 tbsp (15g) of the butter. Add the onions with a pinch of salt.
Cook the onions slowly, stirring occasionally. You are looking for a specific sensory cue: the onions should transition from opaque white to a translucent, golden-brown hue. This process should take about 15-20 minutes. If they begin to crisp, lower the heat; we want them soft and “heaped” as described in the blueprint.
Phase 2: Blistering the Bell Peppers
While the onions are working, slice your red and green bell peppers into thin strips. Increase the heat on a separate burner or move to a hotter section of your grill. Add the neutral oil to the pan or lightly coat the grill grates.
Place the pepper strips down and leave them undisturbed for 2-3 minutes. You want to see “blistered, blackened edges” forming. Toss them quickly and sear for another 2 minutes. The peppers should be tender-crisp—vibrant in color but with those distinct charred marks that signify high-heat cooking. Set these aside with the onions once finished.
Phase 3: The Deep-Char Kielbasa Sear
Take your beef kielbasa and cut it into lengths that match your hoagie buns (usually about 6 inches). Carefully split each piece lengthwise, but do not cut all the way through if you prefer a “butterfly” style, though for this Grilled Kielbasa Sandwich, complete separation allows for more even contact with the heat.
Place the kielbasa cut-side down on the hot grill or skillet. Press down slightly with your spatula to ensure the entire surface area touches the heat. Sear for 3-4 minutes until “deep brown charred grill marks” appear. Flip and cook for another 2 minutes until the exterior is “glistening and juicy.”
Phase 4: Toasting the Foundation
Split your hoagie buns and spread the remaining 1 tbsp (15g) of butter on the cut surfaces. Place them face-down on the grill for about 60 seconds. Look for a “lightly browned” edge while the rest of the roll remains soft. This step is vital to prevent the mustard and vegetable juices from making the bread soggy.
If you’re looking for more grilled inspiration after this, consider our Grilled Seafood Skewers for your next outdoor gathering.
Phase 5: The Final Assembly and Drizzle
Place two split halves of the kielbasa into each toasted roll. Top with a generous heap of the warm, caramelized onions. Layer the blistered red and green pepper strips over the onions.
Finally, apply the yellow mustard in a “thin, jagged drizzle” across the top. The contrast of the bright yellow against the blackened peppers is what creates that iconic, authentic look. Serve immediately while the steam is still rising from the meat.
Expert Tips for the Perfect Handheld Result
- Don’t Rush the Onions: True caramelization is a chemical reaction that takes time. If you turn the heat too high, you’ll get burnt edges rather than the translucent, sweet ribbons that define a great Grilled Kielbasa Sandwich.
- Dry Your Peppers: Before hitting the oil, make sure your pepper strips are dry. Moisture creates steam, and steam prevents the “blistering” effect we are looking for.
- The “Butterfly” Technique: If you find the kielbasa is rolling around, use a heavy press or even another skillet to weigh it down during the first 2 minutes of searing. This ensures those grill marks are deep and continuous.
- Temperature Control: If your sausages are cold from the fridge, let them sit at room temperature for 15 minutes before grilling. This ensures the interior is “juicy and glistening” by the time the outside is perfectly charred.
Storage, Reheating, and Make-Ahead Advice
This Grilled Kielbasa Sandwich is best enjoyed fresh from the heat, but the components can be stored effectively. The caramelized onions and blistered peppers can be made up to 3 days in advance and stored in an airtight container in the refrigerator. Simply reheat them in a pan with a splash of water to restore their silkiness.
The grilled kielbasa can also be stored for 4-5 days. To reheat, we recommend using a toaster oven or the grill rather than a microwave; the microwave will toughen the casing and lose that “snap.” Do not assemble the sandwiches until you are ready to eat, as the mustard and vegetables will soften the bread over time. This recipe is not ideal for freezing once assembled.
Perfect Pairings for Your Grilled Feast
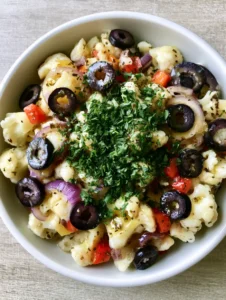
A hearty sandwich deserves sides that can stand up to its bold, smoky flavors. Because this is a rich meal, a crisp, acidic side dish is often the best choice. Our High-Protein Italian Pasta Salad offers a bright vinegar-based dressing that cleanses the palate between bites of savory beef.
If you want to keep the meal purely focused on the grill, serve these alongside some charred corn on the cob or a light Mediterranean Pasta Salad. For those who want to double down on the handheld theme, these sandwiches go beautifully with BBQ Egg Rolls as a unique appetizer. And if you need a refreshing drink to wash it all down, a Frozen Peach Smoothie provides a sweet, icy contrast to the heat of the grill.
Frequently Asked Questions
While we recommend yellow mustard for its classic visual appeal and sharp acidity, spicy brown mustard or Dijon are excellent culinary substitutes that pair well with the smoky beef.
The key is high heat and minimal movement. Use a high-smoke point oil and let the peppers sit undisturbed for a few minutes until the skin bubbles and chars before tossing them.
Smoked beef kielbasa is ideal for grilling because it is already cured, meaning you only need to focus on achieving a deep, flavorful char and heating it through without worrying about undercooking raw meat.
A sturdy white hoagie roll or ‘long roll’ is best. It should be toasted with butter to create a moisture barrier that keeps the bread from becoming soggy from the juicy sausage and onions.
Splitting the sausage lengthwise creates a flat surface area that maximizes contact with the heat source. This results in more Maillard reaction (browning) and those signature charred grill marks seen in professional photos.
The Ultimate Grilled Kielbasa Sandwich Recipe Card

Grilled Kielbasa Sandwich with Blistered Peppers and Caramelized Onions
Ingredients
Equipment
Method
- Melt 1 tbsp butter in a pan over medium-low heat. Add sliced onions and cook for 15-20 minutes until translucent and golden-brown.
- Heat oil in a skillet or on a grill over high heat. Add pepper strips and cook undisturbed for 2-3 minutes until edges are blistered and blackened.
- Place split kielbasa cut-side down on a hot grill. Cook for 3-4 minutes until deep charred grill marks appear and the exterior is glistening.
- Butter the hoagie rolls and toast on the grill for 60 seconds until lightly browned.
- Place kielbasa in buns, top with onions and peppers, and finish with a jagged drizzle of yellow mustard.
Notes
For extra heat, add sliced pickled jalapeños to the top.
Join the Savory Crafted Community!
There is nothing quite like the satisfaction of a perfectly executed Grilled Kielbasa Sandwich. We hope this recipe helps you bring that authentic, smartphone-captured goodness to your own dinner table. The combination of charred meats and sweet, blistered vegetables is a timeless classic for a reason!
If you made this recipe, we want to hear about it! Did you get those perfect grill marks? Let us know in the comments below. Don’t forget to follow us on Pinterest and share your creations with the community. For more easy weeknight wins, check out our Homemade Hamburger Helper or these crowd-pleasing Hawaiian Ham and Cheese Sliders. Happy grilling!