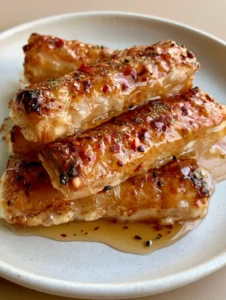
If you are searching for a weeknight dinner that balances effortless preparation with high-impact flavor, look no further than these Crack Chicken Tenders. This recipe transforms humble chicken tenderloins into a gourmet experience featuring bubbling sharp cheddar, smoky bacon, and zesty ranch seasoning.
The visual appeal of this dish is undeniable, with the bright orange cheese forming a gooey, molten layer over the golden-brown chicken. Every bite offers a contrast between the tender meat, the salty crunch of the bacon bits, and the fresh snap of thinly sliced scallions.
Perfectly suited for busy families or anyone craving comfort food, these tenders are baked to perfection in a single dish, minimizing cleanup while maximizing flavor output. Let’s dive into why this specific combination of ingredients has earned its “crack” moniker in kitchens across the country.
Why These Cheesy Ranch Chicken Tenders Are a Weeknight Game Changer
- Irresistible Texture Contrast: You get the juicy snap of seasoned chicken paired with a thick, gooey cheese layer and the ultimate crunch from dark-red bacon crumbles.
- One-Pan Simplicity: By using a white ceramic baking dish, you ensure even heat distribution and a beautiful table-side presentation with minimal dishes to wash.
- The Golden Seasoned Crust: Unlike soggy baked chicken, our technique ensures a light, savory crust forms on the tenderloins before the toppings are even added.
- High-Protein Satisfaction: This dish provides a filling, low-carb-friendly meal that tastes far more indulgent than its nutritional profile suggests.

The Essential Components for Ultimate Crack Chicken Tenders
Chicken Tenderloins (1.5 lbs / 680g): Using actual tenderloins rather than sliced breasts ensures a more delicate, uniform texture that cooks quickly and stays moist. Look for pieces that are roughly the same size for even baking.
Dry Ranch Seasoning (1 oz / 28g packet): This provides the foundational “crack” flavor. It contains a scientific blend of buttermilk powder, dried herbs, and garlic that penetrates the meat deeply during the baking process.
Extra Sharp Cheddar Cheese (2 cups / 226g): We use bright orange sharp cheddar to achieve that classic visual pop. Sharp cheddar has a lower moisture content than mild varieties, allowing it to bubble and brown at the edges without becoming excessively oily.
Crispy Bacon Crumbles (1/2 cup / 60g): Use high-quality thick-cut bacon that has been rendered until dark red and crunchy. The saltiness of the bacon acts as a flavor enhancer for the creamy ranch layer.
Fresh Scallions (3-4 stalks): Finely sliced green onions provide a necessary hit of acidity and freshness to cut through the richness of the cheese and bacon. They also offer a beautiful bright green contrast against the orange cheddar.
Olive Oil (2 tbsp / 30ml): This is the “invisible” ingredient that helps the ranch seasoning adhere to the chicken and facilitates the formation of that golden-brown crust in the oven.
Must-Have Kitchen Tools for This Recipe
To achieve the specific visual result of bubbling cheese and perfectly seared chicken, you will need a few standard kitchen tools. A high-quality 9×13 inch (23x33cm) white ceramic baking dish is preferred because it retains heat effectively, ensuring the cheese stays molten longer.
An instant-read meat thermometer is your best friend here. Chicken tenderloins are lean and can dry out quickly if overcooked; pulling them at exactly the right moment ensures maximum juiciness. You will also want a sharp chef’s knife for those precision-cut scallions.
How to Prepare Your Crack Chicken Tenders Step-by-Step
1. Seasoning and Prepping the Chicken
Preheat your oven to 400°F (200°C). Pat the chicken tenderloins dry with a paper towel to remove excess moisture, which is the secret to getting a light seasoned crust rather than steamed meat.
In a large bowl, toss the tenderloins with 2 tablespoons (30ml) of olive oil and the entire packet of ranch seasoning. Ensure every inch of the chicken is coated in the herbs and spices for a uniform flavor profile in every bite.
2. The Initial Bake for a Golden Crust
Arrange the seasoned chicken in your white ceramic baking dish in a single layer, ensuring they are not touching. This allows the hot air to circulate, creating that golden-brown exterior seen in the professional photos.
Bake the chicken for 12-15 minutes. At this stage, the chicken should reach an internal temperature of about 155°F (68°C). The crust will be set and fragrant, providing the perfect foundation for the heavy garnish to follow.
3. Layering the Cheese and Bacon
Remove the dish from the oven and switch your oven to the “Broil” setting. Generously cover each tenderloin with the shredded sharp cheddar cheese, piling it high so it can melt down the sides of the meat.
Sprinkle the dark-red bacon bits directly onto the cheese. By adding them now, the bacon will slightly “sink” into the melting cheese, anchoring it to the chicken and ensuring every forkful contains both elements.
4. The Final Melt and Garnish
Place the dish back under the broiler for 2-3 minutes. Watch closely! You are looking for the cheese to become gooey and start to bubble and slightly brown at the edges. This creates a depth of flavor through caramelization.
Once removed from the oven, immediately sprinkle the finely sliced scallions over the top. The residual heat will slightly soften the onions without losing their vibrant green color or fresh crunch.

Expert Culinary Tips for Success
- Don’t Use Pre-Shredded Cheese: Store-bought shredded cheese is coated in potato starch to prevent clumping, which can lead to a gritty texture. Shred your own cheddar for the smoothest, gooiest melt.
- The “Tendon” Trick: Chicken tenderloins have a white tendon running through them. To remove it, grip the tip of the tendon with a paper towel and push the meat down with a fork to “zip” it right out.
- Internal Temp is King: Always aim for an internal temperature of 165°F (74°C). If you pull the chicken at 160°F (71°C) before the broiler step, the carry-over cooking will bring it to the perfect final temperature.
- Rest Before Serving: Let the dish sit for 5 minutes after coming out of the oven. This allows the juices to redistribute and the cheese to set slightly, so it doesn’t slide off the chicken.
Storage and Reheating Guidelines
If you happen to have leftovers, these tenders store beautifully in an airtight container in the refrigerator for up to 3 days. They make for an incredible protein addition to a cold salad the next day.
To reheat and maintain the texture of the cheese, avoid the microwave if possible. Instead, place the tenders in an oven or air fryer at 350°F (175°C) for 5-7 minutes. This will re-crisp the bacon and bring the cheddar back to its original bubbling state.
What to Serve with Your Cheesy Ranch Chicken
This dish is quite rich, so pairing it with something bright or starchy creates a balanced plate. For a full comfort food spread, consider serving these alongside some homemade hamburger helper for a nostalgic family feast.
If you want to keep the meal lighter, a fresh vegetable side like a roasted vegetable orzo salad or a high protein Italian pasta salad provides a nice acidic counterpoint to the heavy cheddar and bacon.
For those who love a dipping sauce, a side of creamy balsamic dressing or extra ranch is always a crowd-pleaser. If you are hosting a larger gathering, these tenders also pair excellently with garlic naan bread for an eclectic fusion meal.
Frequently Asked Questions
Yes, you can prep the bacon crumbles up to two days in advance. Store them in the fridge and add them during the broiler step for maximum crunch.
Yes, you can use chicken breasts. Simply slice them into 1-inch thick strips to ensure they cook at the same rate and stay as juicy as traditional tenderloins.
The key is using an instant-read thermometer. Pull the chicken out once it reaches 160°F-165°F. Overbaking is the primary cause of dry chicken.
Absolutely! This recipe is naturally low-carb and keto-friendly. Just ensure your ranch seasoning packet doesn’t have added sugars or cornstarch fillers.
Use freshly shredded sharp cheddar. Pre-shredded cheeses have anti-caking agents that can cause the fat to separate, leading to an oily finish.
The Ultimate Crack Chicken Tenders Recipe

Crack Chicken Tenders with Melted Cheddar and Crispy Bacon
Ingredients
Equipment
Method
- Preheat oven to 400°F (200°C). Toss chicken tenderloins with olive oil and ranch seasoning until fully coated.
- Place chicken in a white ceramic baking dish. Bake for 12-15 minutes until a light seasoned crust forms and internal temp is 155°F (68°C).
- Switch oven to broil. Top chicken with shredded cheddar and bacon crumbles.
- Broil for 2-3 minutes until cheese is bubbling and slightly browned at the edges. Garnish with scallions and serve.
Notes
Remove the chicken tendon using a fork and paper towel for better texture.

Closing & Call to Action
These Crack Chicken Tenders are more than just a quick dinner; they are a flavorful experience that satisfies every craving for salt, fat, and protein. Whether you are serving them for a Tuesday night meal or a weekend game day, they are guaranteed to disappear in minutes.
Did you try this recipe? We’d love to hear how it turned out! Leave a comment below or share your gorgeous food photos with us. Don’t forget to save this recipe to your favorite boards on Pinterest so you always have it on hand!