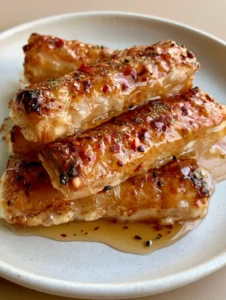
When it comes to crowd-pleasing appetizers that bridge the gap between casual comfort and gourmet flavor, Hawaiian Ham and Cheese Sliders stand in a league of their own. These miniature sandwiches have become a staple at game day parties, holiday brunches, and easy weeknight dinners for a very specific reason: the contrast of flavors and textures.
Imagine a soft, pillowy sweet roll that has been toasted until the edges have a light char, encasing layers of savory, pink deli ham and a thick, decadent layer of Swiss cheese. The magic happens when that cheese melts and begins to ooze from the sides, meeting a glossy, translucent golden-yellow glaze that is heavily studded with poppy seeds and minced onions.
The visual appeal is undeniable, as seen in our latest kitchen session. Captured in the soft natural daylight, these sliders aren’t just food; they are a sensory experience. From the first scent of toasted butter and Dijon mustard to the tactical pull of the melted cheese, every element of these Hawaiian Ham and Cheese Sliders is designed to keep your guests reaching for “just one more.”

The Anatomy of the Perfect Party Slider
- Symphony of Textures: You get the crunch of the toasted roll tops, the softness of the sweet bread, and the creamy, “bubbly” stretch of high-quality Swiss cheese.
- The Signature Glaze: A translucent, golden-yellow wash of melted butter and Dijon mustard that provides a sharp, tangy counterpoint to the sweet Hawaiian rolls.
- Aromatic Depth: Dried minced onions rehydrate in the butter glaze, offering tiny, translucent bits of savory punch in every bite.
- Visual Precision: Heavily studded with black poppy seeds, these sliders look as professional as they taste, mirroring the high-end look of a catered event.
If you are looking to round out your party menu, these sliders pair beautifully with other finger foods. You might consider serving them alongside Crack Chicken Tenders for a high-protein spread that keeps everyone satisfied.
Essential Ingredients for Your Hawaiian Ham and Cheese Sliders
To achieve the specific visual and flavor profile of our Hawaiian Ham and Cheese Sliders, each ingredient must be selected with care. We aren’t just making sandwiches; we are engineering a perfect bite.
The Foundation: Sweet Hawaiian Rolls
You need a 12-pack (approx. 12 oz / 340g) of classic sweet Hawaiian rolls. These rolls provide the necessary structural integrity while offering a unique sweetness that balances the saltiness of the ham.
The Savory Core: Thin-Sliced Deli Ham
Use 1 lb (450g) of thin-sliced savory ham, such as Black Forest or Honey Ham. Slicing it thin is the “forensic” secret; it allows you to create dense, ruffled layers that trap the melting cheese and heat more evenly.
The Melty Component: Swiss Cheese
Opt for 8-10 thick slices (approx. 8 oz / 225g) of Swiss cheese. Swiss is the gold standard here because it becomes “bubbly” and “oozy” without becoming greasy, providing that iconic white-cheese-from-the-sides visual.
The Glossy Glaze: Butter and Dijon
You will need 1/2 cup (115g) of unsalted butter and 1 tablespoon (15g) of smooth Dijon mustard. This combination creates the “glossy, translucent golden-yellow” finish that identifies a truly gourmet slider.
The Texture Toppers: Poppy Seeds and Onion
Include 1 tablespoon (9g) of black poppy seeds and 1 tablespoon (10g) of dried minced onion. These provide the “heavily studded” look and a crunch that breaks up the softness of the rolls.
For those looking to add a bit of heat to their meal, these sliders are a great follow-up to a spicy appetizer like Jalapeño Popper Chicken Enchiladas, which share that same love for melted, bubbly cheese.
Necessary Kitchen Equipment
Achieving the light toasted char and perfectly melted center requires a few basic but essential tools. First, a sharp serrated knife is non-negotiable for slicing the entire block of rolls horizontally without squishing them.
You will also need a 9×13 inch (23x33cm) baking dish or a light-colored ceramic platter that is oven-safe. The light color of the ceramic helps reflect heat gently, ensuring the bottom of the rolls doesn’t burn before the tops are golden-brown.
Finally, a small saucepan for whisking the glaze and a pastry brush are vital. The brush allows you to “drench” the roll tops evenly, ensuring the poppy seeds and onions are distributed perfectly into every crevice.
How to Construct the Ultimate Sliders: Step-by-Step
1. Preparing the Rolls
Preheat your oven to 350°F (175°C). Keeping the 12-pack of rolls intact, use your serrated knife to slice the entire block in half horizontally. Place the bottom half into your lightly greased ceramic baking dish.
2. Layering the Ham and Cheese
Begin by layering half of your Swiss cheese slices directly onto the bread. Follow this with your 1 lb (450g) of thin-sliced ham, ruffling the slices as you go to create volume. Top the ham with the remaining cheese slices; this “cheese sandwich” method ensures the rolls stay adhered to the filling.
3. Crafting the Signature Glaze
In a small saucepan over medium heat, melt the 1/2 cup (115g) of butter. Whisk in the Dijon mustard, poppy seeds, and minced onion. Continue to whisk until the mixture is glossy and the onions have begun to soften slightly in the warm fat.

4. The Drenching Process
Place the top half of the rolls back onto the assembly. Using your pastry brush, generously drench the tops of the rolls with the butter mixture. Ensure you get plenty of poppy seeds and onion bits on every single roll top.
5. Baking for the Perfect Char
Cover the dish with aluminum foil and bake for 12-15 minutes. This traps the steam to melt the Swiss cheese. Remove the foil and bake for an additional 5-7 minutes. Watch for the sensory cue of a “light toasted char” and a “buttery sheen” on the crust.
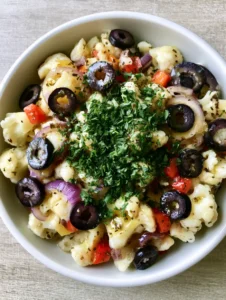
If you enjoy a refreshing side with your warm sandwiches, consider pairing these with a High-Protein Italian Pasta Salad for a balanced lunch or dinner experience.
Expert Tips for Success
- The “Anti-Soggy” Shield: Putting a layer of cheese on both the top and bottom of the ham creates a moisture barrier, preventing the ham’s natural juices from soaking into the bread.
- The Foil Tent: If you notice the tops browning too quickly before the cheese “oozes,” loosely tent the foil rather than wrapping it tightly to allow air circulation.
- Let Them Rest: Allow the Hawaiian Ham and Cheese Sliders to sit for 5 minutes after coming out of the oven. This “sets” the cheese so it doesn’t all slide out when you cut them.
- Quality of Ham: Use ultra-thin “shaved” ham from the deli counter for the best “handheld” texture. Thick-cut ham can make the sliders difficult to bite through.
Storage, Reheating, and Freezing
These sliders are best served fresh and warm, but life happens! To store leftovers, place them in an airtight container in the refrigerator for up to 3 days. The rolls may soften slightly, but the flavor remains excellent.
When reheating, avoid the microwave if possible, as it can make the bread rubbery. Instead, place them back in a 350°F (175°C) oven for about 10 minutes until the cheese is bubbly again. This restores that “toasted char” we worked so hard to achieve.
For freezing, you can assemble the sliders (without the glaze), wrap them tightly in plastic wrap and foil, and freeze for up to a month. Apply the fresh glaze just before baking from a thawed state.
What to Serve with Hawaiian Ham and Cheese Sliders
While these sliders are a meal in themselves, they love company on a platter. For a full “surf and turf” appetizer spread, try serving them alongside Garlic Butter Steak Bites.
If you’re serving these at a summer BBQ, a side of fresh greens tossed in a Creamy Balsamic Dressing provides a sharp acidity that cuts through the richness of the butter and Swiss cheese. The contrast between the hot, melty sliders and a crisp salad is world-class.
Frequently Asked Questions
Yes! You can assemble the sandwiches up to 24 hours in advance. Keep them covered in the fridge, but wait to apply the butter glaze until just before you bake them.
Bake the sliders covered with foil first to melt the cheese, then remove the foil for the last 5-7 minutes to allow the butter and sugars in the bread to caramelize and char.
The key is to place a layer of Swiss cheese on both the bottom and top of the ham. This creates a moisture barrier that protects the bread from the ham’s juices.
Swiss cheese is traditional because of its mild flavor and excellent melting properties. However, Provolone or Gruyere are also fantastic options for a bubbly, oozy texture.
Dried minced onions provide a concentrated savory flavor and a specific texture that rehydrates into the butter glaze without releasing too much moisture into the rolls.
The Final Hawaiian Ham and Cheese Sliders Recipe
Get ready to transform your kitchen into the ultimate snack destination. Follow the measurements below for the most consistent, visually stunning results.

Hawaiian Ham and Cheese Sliders with Buttery Dijon Poppy Seed Glaze
Ingredients
Equipment
Method
- Preheat oven to 350°F (175°C). Use a serrated knife to slice the entire block of Hawaiian rolls in half horizontally.
- Place the bottom half of the rolls in a lightly greased baking dish. Layer with half of the Swiss cheese, all the ham (ruffled for volume), and the remaining cheese slices.
- In a small saucepan, melt butter and whisk in Dijon mustard, poppy seeds, and dried onion until glossy and translucent.
- Place roll tops on the assembly. Brush the butter mixture generously over the tops until they are drenched and heavily studded with seeds and onion.
- Cover with foil and bake for 12-15 minutes. Remove foil and bake 5-7 minutes more until the tops show a light toasted char and cheese is bubbly.
Notes
Let the sliders rest for 5 minutes before slicing to ensure the cheese sets.

The Ultimate Party Food Awaits
There is a reason why Hawaiian Ham and Cheese Sliders are a viral sensation year after year. They are the perfect marriage of salty, sweet, tangy, and creamy. Whether you are hosting a large crowd or just looking for a fun family dinner, this recipe delivers professional results with minimal effort.
If you loved this recipe, please leave a comment below and tell us how yours turned out! Don’t forget to share your photos and tag us on Pinterest so we can see your beautiful, bubbly sliders.